Showing posts with label Widgets. Show all posts

Tuesday, 2 October 2012

Add Sleek and Cool Search Boxes to Blogger


We recently shared simple yet cool search boxes widget for blogger. Now its time for something new, cool, beautiful and sleek. So here comes sleek and cool search boxes for blogger/blogspot. It’s using simple image and css, HTML. Actually these are PSD source designed by Design3edge. We work hard in converting this to Blogger for YOU. Hope you enjoyed with this!
sleek search boxes by allbloggingtips

How To Add Cool Search Boxes To Blogger

  1. Login to Blogger Dashboard   => Design tab  => Page Elements .
  2. Click on Add a Gadget where you wish to place this Search Boxes.
  3. Choose HTML/JavaScript from the List.
  4. Place any one Search Box code in to it and Save the Gadget.

Style 1

search boxes
<style type="text/css">
#abt-searchbox{
border-radius:5px;
background:URL(https://blogger.googleusercontent.com/img/b/R29vZ2xl/AVvXsEhs6k-_oMmy_Bq0s8pFYPII2t4P_DJRliRWjegMQO7XjIF1Wp3_88bhCdW6q1DB6hxDrOTXw_A3EJ4q0YSbvpTNw8pqIGCjhZ0A-syfbxPORogok0bJH8Hc5oyOil626GRccCZiQxa4DnA/s1600/black.png) no-repeat scroll center center transparent;width:307px;height:50px;disaply:block;}
form#abt-searchform{display: block;padding: 10px 12px;margin:0;}
form#abt-searchform #s{padding-left:16px !important; padding:7.5px;margin:0;width: 235px;font-size:14px;vertical-align: top;border:none;background:transparent;}
form#abt-searchform
#sbutton{margin:0;padding:0;height:40px; width:44px;vertical-align: top;border:none;background:transparent;}
</style>
<div id="abt-searchbox">

<form id="abt-searchform" action="/search" method="get">
    <input type="text" id="s" name="q" value="Search..." onfocus='if (this.value == "Search...") {this.value = ""}' onblur='if (this.value == "") {this.value = "Search...";}'/>
    <input type="image" src="http://img1.blogblog.com/img/blank.gif" id="sbutton" />
</form>
</div>

Style 2

search boxes
<style type="text/css">
#abt-searchbox{
border-radius:5px;
background:URL(https://blogger.googleusercontent.com/img/b/R29vZ2xl/AVvXsEiXkL2QPdnpqMd0JvCBTqcPhp9yVgivkKRUcKl4ty4srOzl349QyL4gOu_1gBm5bUQ6R4tc4KsuUeo4awnhU5oYfmIQ3KV5rlrgC2G0Fzr_jgZ3tgS7hg2hCCuD00ClLc9rwNFZKebJq2c/s400/whitez+by+abt.png) no-repeat scroll center center transparent;width:307px;height:50px;disaply:block;}
form#abt-searchform{display: block;padding: 10px 12px;margin:0;}
form#abt-searchform #s{padding-left:16px !important; padding:7.5px;margin:0;width: 235px;font-size:14px;vertical-align: top;border:none;background:transparent;}
form#abt-searchform
#sbutton{margin:0;padding:0;height:40px; width:44px;vertical-align: top;border:none;background:transparent;}
</style>
<div id="abt-searchbox">

<form id="abt-searchform" action="/search" method="get">
    <input type="text" id="s" name="q" value="Search..." onfocus='if (this.value == "Search...") {this.value = ""}' onblur='if (this.value == "") {this.value = "Search...";}'/>
    <input type="image" src="http://img1.blogblog.com/img/blank.gif" id="sbutton" />
</form>
</div>

Style 3

search boxes
<style type="text/css">
#abt-searchbox{
border-radius:5px;
background:URL(https://blogger.googleusercontent.com/img/b/R29vZ2xl/AVvXsEh6y64UaBE_-1TTEmd6oVA4NAvBZjw8pcOXGHr4h3mdtBUEBaex6909WvhwiGkjOlItS-zAH4OZDb-x1EQT2nB9Z-pe6GMjTLo0zU5ffbPqvReEvur5puzLeae8qU2OOWipb1b5sTz5VDE/s400/bluez+by+allbloggingtips.png) no-repeat scroll center center transparent;width:307px;height:50px;disaply:block;}
form#abt-searchform{display: block;padding: 10px 12px;margin:0;}
form#abt-searchform #s{padding-left:16px !important; padding:7.5px;margin:0;width: 235px;font-size:14px;vertical-align: top;border:none;background:transparent;}
form#abt-searchform
#sbutton{margin:0;padding:0;height:40px; width:44px;vertical-align: top;border:none;background:transparent;}
</style>
<div id="abt-searchbox">

<form id="abt-searchform" action="/search" method="get">
    <input type="text" id="s" name="q" value="Search..." onfocus='if (this.value == "Search...") {this.value = ""}' onblur='if (this.value == "") {this.value = "Search...";}'/>
    <input type="image" src="http://img1.blogblog.com/img/blank.gif" id="sbutton" />
</form>
</div>

Style 4

search boxes
<style type="text/css">
#abt-searchbox{
border-radius:5px;
background:URL(https://blogger.googleusercontent.com/img/b/R29vZ2xl/AVvXsEiUGYL0GEGIDG2_AD2kFvXRjIkhlUtS8LJEEqLURupYGb7wQr0Zvo70jLIlCnTwZFuseZGF3i0ktTvqp_xXyW64z3MQZxgraG_XY-z6kqWKIQ_yxaOXq7Rinx_DlFlkswN9QrEpLb2DKHI/s400/transparent+by+allbloggingtips.png) no-repeat scroll center center transparent;width:307px;height:50px;disaply:block;}
form#abt-searchform{display: block;padding: 10px 12px;margin:0;}
form#abt-searchform #s{padding-left:16px !important; padding:7.5px;margin:0;width: 235px;font-size:14px;vertical-align: top;border:none;background:transparent;}
form#abt-searchform
#sbutton{margin:0;padding:0;height:40px; width:44px;vertical-align: top;border:none;background:transparent;}
</style>
<div id="abt-searchbox">

<form id="abt-searchform" action="/search" method="get">
    <input type="text" id="s" name="q" value="Search..." onfocus='if (this.value == "Search...") {this.value = ""}' onblur='if (this.value == "") {this.value = "Search...";}'/>
    <input type="image" src="http://img1.blogblog.com/img/blank.gif" id="sbutton" />
</form>
</div>

Style 5

search boxes
<style type="text/css">
#abt-searchbox{
border-radius:5px;
background:URL(https://blogger.googleusercontent.com/img/b/R29vZ2xl/AVvXsEg7-vKJTRJJGhjgPe1GTI2rWxUCJnMZMPQ92EKTKBOBz2_HUVyg31odmUVdNco4RbTxo9CvwJe8DaH_erVcn7P72zPzYAc91uzQYAeJK_xIlFhHbyNJmzHcXIjoRNNCOrIYzizR6RG2Jf4/s400/pinkz.png) no-repeat scroll center center transparent;width:307px;height:50px;disaply:block;}
form#abt-searchform{display: block;padding: 10px 12px;margin:0;}
form#abt-searchform #s{padding-left:16px !important; padding:7.5px;margin:0;width: 235px;font-size:14px;vertical-align: top;border:none;background:transparent;}
form#abt-searchform
#sbutton{margin:0;padding:0;height:40px; width:44px;vertical-align: top;border:none;background:transparent;}
</style>
<div id="abt-searchbox">

<form id="abt-searchform" action="/search" method="get">
    <input type="text" id="s" name="q" value="Search..." onfocus='if (this.value == "Search...") {this.value = ""}' onblur='if (this.value == "") {this.value = "Search...";}'/>
    <input type="image" src="http://img1.blogblog.com/img/blank.gif" id="sbutton" />
</form>
</div>

Credits

This is again a first time shared tutorial guide by AllBloggingTips. These scripts, widget and style sheets are provided only by ABT  therefore if you wish to share this tutorial with your readers and friends then kindly link back to this post as the only favour in return. :D
That’s all!. We hope you enjoyed this Cool Search Boxes. You can also subscribe  us to get our next tutorial in your inbox ;)

How to Add Cool Floating Notification bar in Blogger


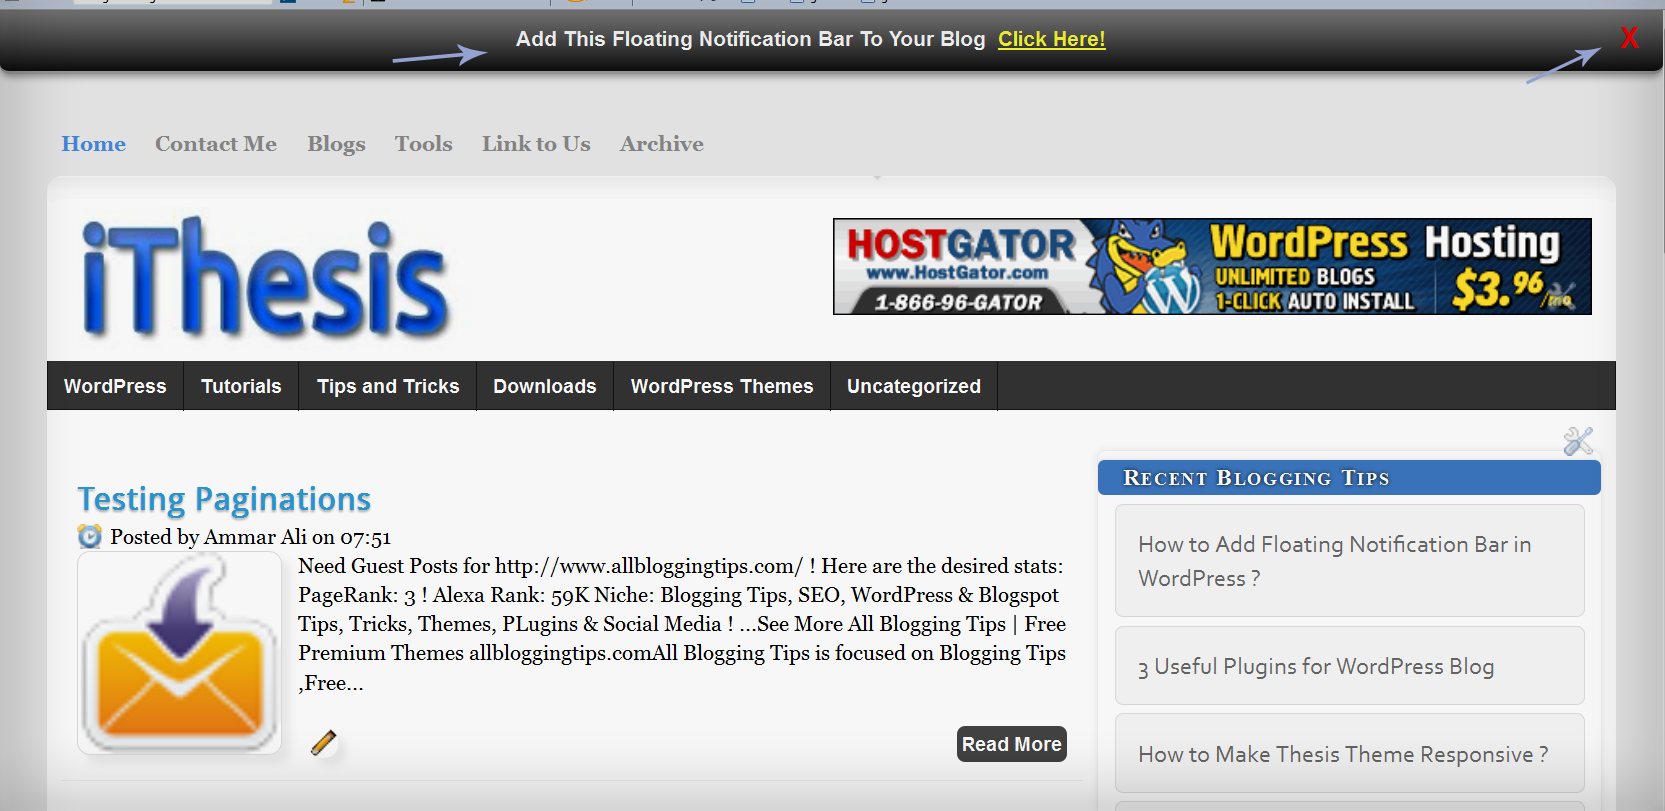
We already shared a floating notification bar for wordpress recently. Many of my readers request to create this floating notification bar for Blogspot/Blogger blogs and today we are sharing a simple yet Cool Floating Notification bar for Blogger. Its very easy to add this widget in blogspot. All you have to do is copy code given below, paste it in to your blog and customize text, link etc according to your needs. Isn’t that simple! :D
Blogger floating notification bar copynotification

Add Cool Floating Notification bar in Blogger !

First  Always Back Up Your Template Before You Any Make Changes – How To Back Up A Blogger Template
  • Goto Blogger  => Design => Edit HTML
  • Next search for this code
<body>
  •   Just below it paste the following code,
<!-- Notification code start -->
<style type='text/css'>
#ut-sticky
{
background: #7d7e7d; /* Old browsers */
background: -moz-linear-gradient(top,  #7d7e7d 6%, #7d7e7d 9%, #0e0e0e 99%); /* FF3.6+ */
background: -webkit-gradient(linear, left top, left bottom, color-stop(6%,#7d7e7d), color-stop(9%,#7d7e7d), color-stop(99%,#0e0e0e)); /* Chrome,Safari4+ */
background: -webkit-linear-gradient(top,  #7d7e7d 6%,#7d7e7d 9%,#0e0e0e 99%); /* Chrome10+,Safari5.1+ */
background: -o-linear-gradient(top,  #7d7e7d 6%,#7d7e7d 9%,#0e0e0e 99%); /* Opera 11.10+ */
background: -ms-linear-gradient(top,  #7d7e7d 6%,#7d7e7d 9%,#0e0e0e 99%); /* IE10+ */
background: linear-gradient(top,  #7d7e7d 6%,#7d7e7d 9%,#0e0e0e 99%); /* W3C */
filter: progid:DXImageTransform.Microsoft.gradient( startColorstr=&#39;#7d7e7d&#39;, endColorstr=&#39;#0e0e0e&#39;,GradientType=0 ); /* IE6-9 */

border-bottom:2px solid #999;

color:#fff;
text-align: center;
margin:-12px auto;
padding-bottom:1px;
border-top: 1px solid #333;
height:38px;
font-size:13px;
position:fixed;
vertical-align: baseline; overflow:hidden;
z-index:999;
width:100%;
border-bottom-left-radius:6px;
border-bottom-right-radius:6px;
display:block;
font-weight: bold;
font-family: arial,&quot;Helvetica&quot;;
font-color:#fff;
 -moz-box-shadow: 0 2px 4px hsla(0,0%,0%,.35);
 -webkit-box-shadow: 0 2px 4px hsla(0,0%,0%,.35);
}
#ut-sticky:hover
{

background-color:#333;background-image:-moz-linear-gradient(top,#555555,#434343);background-image:-ms-linear-gradient(top,#555555,#434343);background-image:-webkit-gradient(linear,0 0,0 100%,from(#555555),to(#434343));background-image:-webkit-linear-gradient(top,#555555,#434343);background-image:-o-linear-gradient(top,#555555,#434343);background-image:linear-gradient(top,#555555,#434343);background-repeat:repeat-x;filter:progid:DXImageTransform.Microsoft.gradient(startColorstr=&#39;#555555&#39;,endColorstr=&#39;#434343&#39;,GradientType=0)

-webkit-transition:all 1.3s ease-in-out;-moz-transition:all 1.3s ease-in-out;-o-transition-duration:all 1.3s ease-in-out;transition:all 1.3s ease-in-out;

 -moz-box-shadow: 0 2px 4px hsla(0,0%,0%,.35);
 -webkit-box-shadow: 0 2px 4px hsla(0,0%,0%,.35);

}

#ut-button {background:#fff; padding:4px; color:black;text-shadow:0 -1px 0 rgba(255,255,255,0.25);background-color:white}

#ut-sticky p{line-height:5px; font-size:13px; text-align:center; width:95%; float:left;}
#ut-sticky p a{ text-decoration:underline; padding:4px; color:#FFFF33;}
.ut-cross{display:block; position:relative; right:15px; top:4px;float:right;}
.ut-cross a{font-size:18px; font-weight:bold; font-family:&quot;Arial&quot;; color:#FF0000; line-height:30px;}
.ut-cross, a:hover{color:#DDD; text-decoration:none;}

</style>
<div id='ut-sticky'>
<p style='padding-top:17px;'>Add This Floating Notification Bar To Your Blog <a class='ut-button' href='http://www.allbloggingtips.com' target='_blank'>Click Here!</a></p>
<div class='ut-cross'><a href='javascript:hide_cross();'>X</a></div>
</div>
<script language='JavaScript'>
function hide_cross() {
crosstbox = document.getElementById(&quot;ut-sticky&quot;);
crosstbox.style.visibility = &#39;hidden&#39;;
}
</script>
<br/><br/>
<br/><br/>
<!-- End of Notification code, info - http://www.allbloggingtips.com -->
To Customize it
After adding above code just edit above HIGHLIGHTED text and link to your desire text.
I hope you enjoyed this cool Floating Notification bar widget. Do let me know if you face any problem. Peace, blessing pals :D

Thursday, 27 September 2012

Add Facebook Comments Box To Blogger

1. If you wish to completely hide the blogger comments form then read Replace Blogger comments form With Facebook

2. Show both Facebook and Blogger Comments inside Tabs!

facebook-comments-boxIn 2009 Facebook developers introduced their best social plugin called "Facebook Comments Box". This plugin can be embedded in any website or blog and visitors can use their IDs of Facebook, Yahoo, AOL or Hotmail to leave a comment at your site. This plugin did show a lot of problems when it was embedded in Blogger Blogs in initial days of its development but now thanks to our fellow friend Max from Allblogtools this plugin has been finally bloggerized to work just perfect with any Blogger hosted blogs. I have edited Max's coding in some areas and have mentioned some more interesting options that will help you use the Facebook comments box in parallel to your old Blogger Comment form so that you may loose no previous comments and provide users with multiple options of commenting from different platforms.

This is how the Facebook Comments box looks like,
LIGHT SCHEME
facebook-commentS-box LIGHT
DARK SCHEME
Facebook-comments-dark-scheme

Interesting? Lets now learn how to embed this extremely useful comment form in Blogspot blogs. Kindly follow the simple steps below,

1- Get a Facebook Application ID

  1. Go To Facebook Developers Page
  2. Submit your blog URL and give it a name. Keep Site name as your "Blog Title" andSite URL as your "blog address"
site-url
     3.   Hit "create app" button and proceed
     4.   After submitting the security check code you will see this page,
app-id
       5.   Save that App ID in a notepad because we will need that latter. Now Click the link near the top-right corner of the same page that says "Developer Dashboard
image
      6.  One the new window that appears click the Edit Settings link ,
edit-settings
        7.  Then go to Website option and write your Site Domain as blogspot
website
       8.  Save Changes and jump to the next step of this tutorial

2- Adding the Facebook comments Box to Blogger

Now its time to do embed the comments box in your blog templates. So follow these easy steps,
PS: Please make sure your blogger comment form is embedded below posts. For doing this first go to Blogger > Settings > comments > and then choose embed comments below posts. After doing this follow the tutorial below.
  1. Go To Blogger > Design > Edit HTML
  2. Backup your template
  3. Check the "Expand Widget Templates" box
  4. Search for <html and just after it give a space and add this code,
xmlns:fb='http://www.facebook.com/2008/fbml'
  5.  Next search for
<Body>
Note: In New Blogger Designed templates the same code looks like this,
<body expr:class='&quot;loading&quot; + data:blog.mobileClass'>
any one of these codes and just after it paste the code given below,

<div id='fb-root'/> 
<script> 
    window.fbAsyncInit = function() { 
    FB.init({ 
      appId  : &#39;YOUR_APP_ID&#39;, 
      status : true, // check login status 
        cookie : true, // enable cookies to allow the server to access the   session 
      xfbml  : true  // parse XFBML 
    }); 
  };
    (function() { 
    var e = document.createElement(&#39;script&#39;); 
      e.src = document.location.protocol +   &#39;//connect.facebook.net/en_US/all.js&#39;; 
    e.async = true; 
      document.getElementById(&#39;fb-root&#39;).appendChild(e); 
    }()); 
</script>

  • Replace YOUR_APP_ID with your Facebook application ID that you saved in a notepad.
    6.    Next search for  </head> and just above it paste the following code,
<meta expr:content='data:blog.pageTitle' property='og:title'/> 
<meta expr:content='data:blog.url' property='og:url'/> 
<meta content='MY Blogger Tricks' property='og:site_name'/> 
<meta content='BLOG-LOGO-IMAGE-LINK' property='og:image'/> 
<meta content='YOUR_APP_ID ' property='fb:app_id'/> 
<meta content='http://www.facebook.comBlogging4pkblogspotcom' property='fb:admins'/>
<meta content='article' property='og:type'/>
Make these changes:
  • Replace MY Blogger Tricks with your blog title/Name.
  • Replace BLOG-LOGO-IMAGE-LINK with the image link of your logo. Your logo will look good if it is in gif format and having this size ->  40px by 40px . This logo will appear next to your post title on Facebook profiles of your visitors like this,
logo
  • Replace YOUR_APP_ID  with the your Facebook Application ID that you saved in notepad
  • Replace http://www.facebook.com/blogging4pkblogspotcom with your Facebook user profile link
    7.    Now Search for this,
<b:includable id='comment-form' var='post'>
    8.    Just after it paste the code given below,
<b:if cond='data:blog.pageType == &quot;item&quot;'> 
<div style='padding:0px 0px 0px 0px; margin:0px 0px 0px 0px;'><script src='http://connect.facebook.net/en_US/all.js#xfbml=1'/>
<div> <fb:comments colorscheme='light' expr:href='data:post.url' expr:title='data:post.title' expr:xid='data:post.id' width='520'/></div>
<div style='color:#fff; background-color:#3B5998;border: solid 1px #ddd; font-size:10px; padding:3px; width:510px;'>Facebook Blogger Plugin: Bloggerized by <b><a alt='blogger templates' href='http://blogging4pk.blogspot.com' style='text-decoration:underline; color:#fff;' target='_blank' title='blogger templates'>All Blogging Tools</a></b> Enhanced by <b><a alt='blogger widgets' href='http://blogging4pk.blogspot.com' style='text-decoration:underline; color:#fff;' target='_blank' title='Blogger Widgets'>All Blogging Tools</a></b></div></div>
</b:if> 
  • If you want to use the dark scheme then simply replace light with dark
  • To change the Comments box size, change this value width='520'
  • To change the footer credits size, change this value width:510px
  • Keep a difference of 10 pixels between the box size and footer size. For example if you set box-size to width='600' then set footer-size towidth:590px
      9. Save your template and Bingo you are Done! See your blogs to find a beautiful comment box waiting to be touched. =)

Respect Copyright

This plugin contains credits to allblogtools and MBT blog for the efforts put by us in facilitating blogger users with this great commenting plugin. We therefore request you to please do not remove the footer credits. The credits are attached to the plugin in a design style that it perfectly blends the colour themes of Facebook Comments Box. We only need this favour in return.

Troubleshooting

If you faced any problem then kindly do not hesitate to let me know. It would be a pleasure to be at your service. I will write more tutorials on this topic this week so that you may get all the latest updates. I hope this plugin proves useful to most of you and it may bless your blogs with even more organic traffic. Peace! :>


Search

Followers

Copyright © 2012 | Blogging Tutorials. By Blogging Experts